This tutorial should take at least 1 hour for a beginner and a few minutes for a pro!
You also need to look for a rock surface image to be used later in this tutorial.Step 1: Creating the Dark Sky
Open Photoshop CS6/CC and create a new Document.Enter the following
Name: Deep Sky ,Width:1550 , Height:870, Resolution: 150, Color Mode: RGB. See figure Below.
On your Tools panel,make sure your Foreground color is Black and Background color is white by pressing leter D key on your keyboard (This helps photoshop reset and load default colors) on PC.
On your layers panel (if you don't see it,go to window menu ,choose layers) select the background layer,selsect Edit menu ,choose Fill, in the dialogue box choose foreground on content.click ok
Your art-board should be filled with black right now,see figure below.
Double-click on background layer to rename ,Enter Small starts for name.see figure below.
Step 2: Creating the Stars.
Select Small Stars layer(Your layer should have a blue highlight to indicate it has been selected),choose filter menu, choose Noise >>Add Noise.Let the amount 400, Make sure Gaussian and monochromatic are selected(you can uncheck and check preview button to see the effect)click OK. See figure Below.
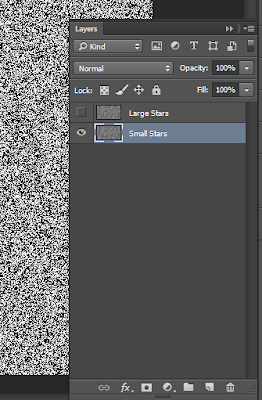
Right click(or Ctrl+J) on Small Starts layer ,choose duplicate ,type Large Stars and click OK.You should have two layers now.Hide the visibility of Large Stars Layer by clicking the eyeball on the layers pane.Select Small Stars layer to make it active.see figure below.
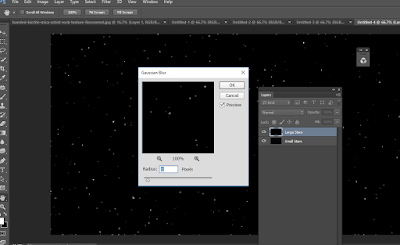
With Small Stars selected,choose filter menu >> Blur>>Gaussian Blur input 0.5 as the radius.Click OK.
Choose Image menu>>Adjustments>>Levels.Enter 200 for blacks(inputs) and 0.42 on mid-tone(gamma) let the whites(outputs) remain to 255.You should notice the small white stars against the black sky. when you Click OK.your result should look like this!see figure below.
Show the visibility by clicking the eyeball on the layers panel of the Large Stars Layer and select it to make it Active.Choose filter menu>>Blur>>Gaussian Blur enter 2 on radius pixels.Click ok
Choose Image Menu>>Adjustments>>Levels for inputs enter 170 and for outputs enter 172.You should realize larger and fewer stars.click OK.Your result should look like the figure below.
To soften the larger stars,lets add a Gaussian blur of 1 pixel.
Step 3:Adding an Outer Glow and Shinny Effect on the Large Stars.
Make sure Large Stars layer is selected and zoom in to around 66.67 % (press (Ctrl +) keys to zoom and (Crtl -) keys to zoom out(you can also opt to use the zoom tool from you tools panel)),. Show Channels Panel (window menu>>channels),at the bottom of the channels panel, choose load channel as a selection icon.you should should see Marching ants around multiple large starts.see figure below.
Delete the Large stars layer (right-click delete ) because we already have its content selected via channels.
Add a new layer and name it Outer Glow , fill it with white by going to edit fill white.double-click on you Outer Glow layer to launch layer style dialog box.check outer glow and click on the word Outer Glow.change the blend mode to Normal,Opacity 35-40 % ,color to white and size to 10 pixels.click OK.
choose select menu>>Deselect to deselect the large stars.
choose select menu>>Deselect to deselect the large stars.
Your result should look ,like or close to this by now.close the visibility outer glow layer on and off to see the effect!
To end this step,lets merge all layers by pressing( Crtl + E )or right-click on layers >> merge layers .Rename the resulting layer as STARS.
Step 4: Creating the Stratified Star Constellations in the Deep Sky Effects!
(Example Orion-hope you get the idea )Add a new layer above Stars and name it Clouds.select Clouds layer and fill it with black.Choose filter menu>> Render>> Clouds.Change the blend mode to color dodge.
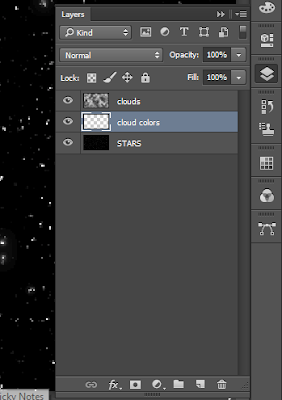
Add a new layer and name it Cloud Colors.Drag it down to be between stars and clouds layers.Make sure cloud colors layer is active by selecting it (We paint in with with multiple colors using the brush too from tools panel).
Pick the brush tool from your tools panel, make its size to be 700 pixels , Hardness 0% and Opacity 10 %,head over to window menu and launch brush panel,under brush presents,make sure non of the other options are selected except smoothing.See figure below.
Press F5 the hide the brush panel tool,click the foreground color to launch the color picker and choose a deep blue color its Hex value 0018FF.Brush over the lager areas of your sky . See figure below!
Choose another bright color, 00ffea continue to paint on star-fields to simulate Gasses , Nebula and other formations. to reduce the brush size use the square brackets on your PC's keyboard(the right bracket to increase ,the left to decrease the size). Your result should at- least look like the figure below.
At this point let's filter with a blur to make the colors a bit softer.choose filter menu>>blur>>Gaussian blur.Enter,enter 80 pixels and click OK.You will find the colors to be a bit softer than before.See figure below
Change the color to 6000ff and increase the brush size and paint across your star fields.add one more color ffd200 and brush over areas with more colors to increase the density of its formation.See figure below.
Step 5:Adding A celestial Sphere.
Open an Rock image in Photoshop.make the Background layer active by selecting it,Using an elliptical marquee too,make an nice elliptical selection while holding shift key.Press (Ctrl + J) to duplicate the layer and rename it to sphere.
Select the sphere layer and add a distortion by choosing filter menu>>distort> spherize.let the amount be 100.Repeat the distortion effect one more time. (If your distorted sphere is not perfect you can choose edit>>free transform to resize it proportionally from any of the corners into a perfect sphere.). See figure below.
Switch to deep sky document and make clouds layer active.Then switch to your rock document. With the Sphere layer selected,undock the window and drag the sphere layer into deep sky document,Sphere layer should be pasted above the clouds layer.See Figure below.
If your sphere layer is too large,choose edit >>free transform to see the bounding box, resize it to a nice round circle.See figure below.
Add a new layer and name it Shadow and make it active by selecting it.With shadow layer active,press and hold the Ctrl key and click on the Sphere layer.You should see matching arts around the sphere.Tap letter D on your keyboard to reset colors to default,choose Edit >>Fill>>Foreground. Click add layer mask icon on the layer panel to add a layer mask on the shadow layer.
Click the chain(link) icon Between the layer(black circle )and the Mask(White circle) thumbnails, (this helps you manipulate the layer(black circle) individually and the mask(white circle) individually).
Click the shadow layer (black circle). Add a Gaussian Blur filter of 15 pixels. Reduce it's opacity to 90% if the shadow is too hard.
Drag the shadow slightly to the bottom-right and reveal a portion of the sphere.You may also resize to enlarge slightly (not a must). See figure below.
Step 6:Adding an Outer-glow and Inner-glow to Make It Look More Ethereal.
Make the Sphere layer active.Double click on it to launch layer styles dialog box.Click on the outer glow,and make the blend mode screen,opacity 35% color D7cab8 and size 60 pixels.click on the inner glow and make the blend mode lighten,opacity 40% color d7cab8 and size 60 pixels.
Finally lets add a bright star lightly above the sphere .Select sphere layer and Press and hold Shift +Ctrl +Alt+E simultaneously to create a composite layer of the deep sky.Rename the resulting layer as All.
With ALL layer selected,choose filter menu >>Render>>Lens Flare.Set Brightness to around 100% and lens type 35 mm Prime.you can move the lens in the image preview as you please.Click OK. see figure below.
This is the resulting image.
You may have a varied result and that's OK! If you may share your results pics too.leave a comment and share with your friends if you find this tutorial informative.


