This is rather an intermediate tutorial. You need to know your way around adobe illustrator CS6 /CC interface.Should take you at most 1 Hour to complete.I recommend that you make notes as you progress.
The following panels are important.
layers panel,swatches,transparency,Brush and Image trace
STEP 1: Creating a single edible Piece of the orange
Create a new blank document .Choose view>>hide art-boards to hide all destructive backgrounds.
Pick the polygon tool, from the tools panel,click on your Art board make sure faces is 3.On control panel,choose transform ,make it 2 in width and 3 in Height.
Remove the stroke and fill it with R=252,G=161,B=0.On your layers panel rename the path layer as orangecolor See image Below.
Now ,lets make our triangle have some rounded corners.Choose effect>>stylize>>round corners.Set the radius to 0.5 click OK.See Image Below.
With the shape still selected,choose Object>>Expand Appearance .With the shape still selected,Choose Edit>>Copy(CTRL + C) to copy,and back to Edit>>paste in front(CTRL+ F) to paste in front..You should now have to identical shapes stacked on each other.You can see it better on your layers panel.Select the top layer and rename it to Stainedglass. See Image Below.
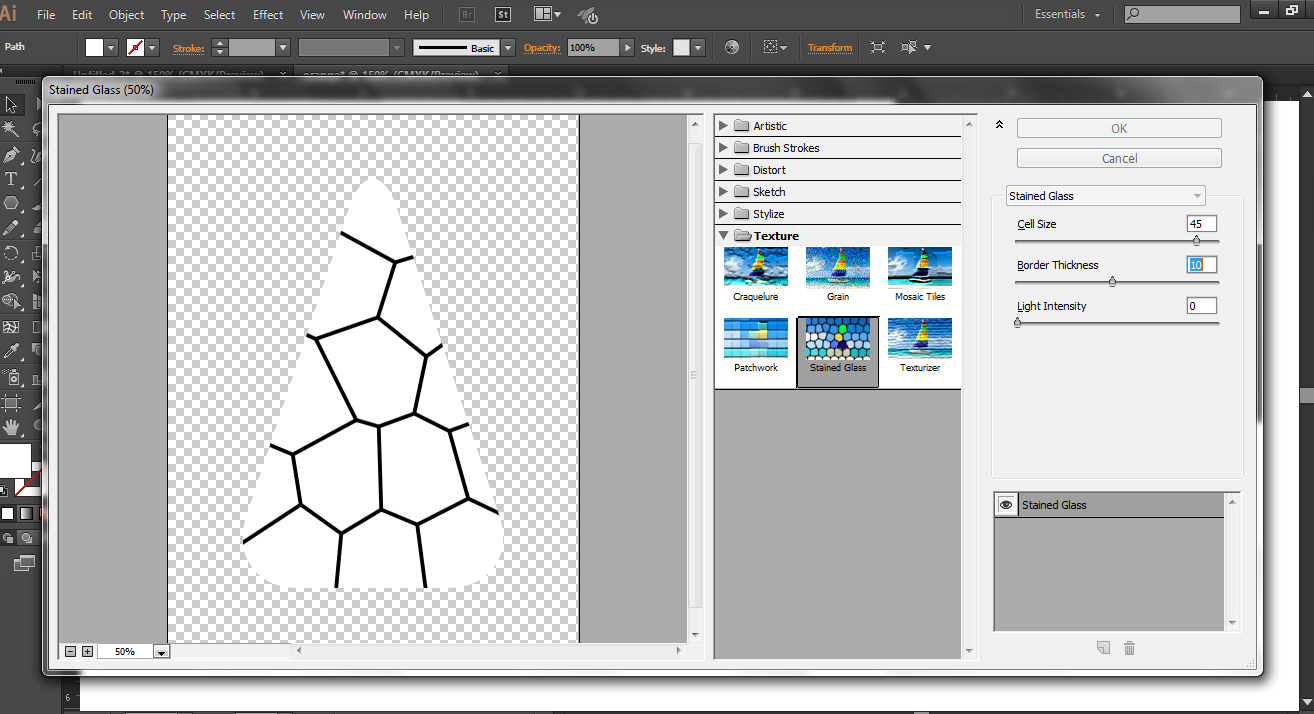
With Stainedglass selected,Fill it with white, R=255,G=255,B=255 then,Choose Effect>>Texture>>Stained Glass. Enter the values you see in the image below.(I recommend you slide to increase and decrease the amount in cell size and border thickness to see the change in the preview).
Click Ok,,Choose Edit >>Expand Appearance.See the image Below.
To reveal the cell color(which is the initial color of the orangecolor shape). we will need to hide the white (ignore) white color of the cell.To do this,we need to trace the image.,Choose window>>Image Trace panel. Choose 16 colors on presets(give it a minute to render),expand advanced options and check ignore whites(it will render again) your result should look like the image below.
Finally choose Object>>Expand.Ensure Object and Fill is selected.See image Below.
With the same selection,change the Fill color from black to white.Then chose Object>> Ungroup two or three times until the objects are not grouped anymore.
Choose Object>>Path>>Simplify.Set curve precision to 85% click OK.
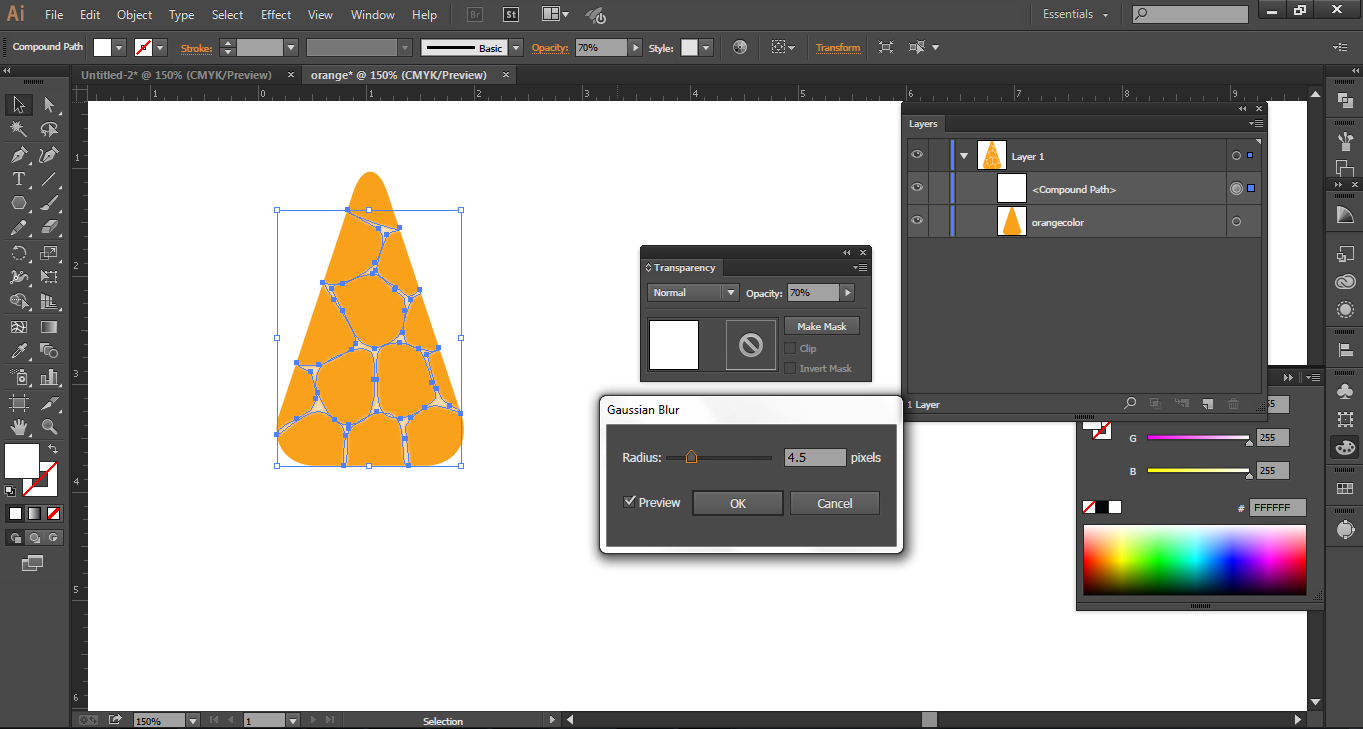
Choose window>>Transparency and set the opacity to 70% then choose Effect>>Blur>>Gaussian set the Radius 4.5 .Click OK. See Image Below.
Select all the shapes Choose >>Object>>Group.See image Below.
We now have the first piece if the orange fresh!
STEP 2: Creating the other pieces of the orange.
Pick the rotate tool from the tools panel. and click on the image.See the image below.
Still using the Rotate tool, Press and hold Alt Key and click slightly above the tip of the shape (this help us define our center.From the resulting dialog box,set the angle value to 40 . See image Below.
When you click Copy,you will end up with two pieces .See Image Below.
To replicate the other pieces,all you need to do is Press CTRL +D Seven times to complete the whole orange fresh.See Image Below.
To loose the straightness of the slices,select two slices as illustrated below,Pick the Pucker Tool and double click on it and enter the values you see in the image below.
The point here is to click in between the white gap of the two selected slices with an intention to slightly distort the paths without loosing the general appearance to the slices.Repeat this process with all the shapes.Your result should somehow look like the image below or even better!
STEP 3: creating the inner circular layer part of the orange.
Pick an ellipse too and draw it above the slices preferably 6 by 6 inches.set fill to non and outline black . See Image Below
We will then draw multiple small ellipses,fill them with a bright and dark orange color.Show brushes panel,select the ellipses and drag to brushes panel ,select pattern and click Ok .Ok ,s as shown below.
After saving it as a patter brush,you can now paint over the outline of the ellipse,reduce it size if necessary and reduce the transparency opacity to around 15% to make it vivid.See image below.
Draw another ellipse slightly larger 7 by 7 inches ,choose Object>>Arrange>>Send to Back.Remove the Stroke and fill it with a Radial Gradient,to show gradient panel,choose window>>gradient).The following are the color coordinate arrangement order from left to right of gradient fill.
Position 0% - R=255 , G=255 ,B=255.
Position 45%- R=255, G=254, B=244.
Position 80.15%- R=253,G=248, B=195.
Position 94.18%- R=252,G=241, B=115.
Position 100%- R=245,G=130, B=32.
Your results should look like this or close
STEP 4: Creating the Skin of the Orange
Select all and choose Object>>Group to group all objects.On control bar,Choose Transform and change only the width to 6.2.
Pick an ellipse tool and draw an ellipse width,6.2 and height 7 inches,Fill it with R=249,G=161,B=27 with no stroke.See Image Below.
Pick a Rectangle tool ,and draw a rectangle vertically intersecting the ellipse and select the two shapes.See Image Below.
Choose Window >>Pathfinder to launch the panel.Choose Minus front under shape modes to remain with half an ellipse.See Image Below.
Choose Edit>>Copy then Edit>>Paste front and Fill it with Black. See image below.
Then choose Effect >>Artistic >>Sponge.set the values to;
Brush size: 9,
Definition :16,
Smoothness :6,
Choose Effect>>Artistic>>Plastic Wrap set the values to;
Highlights strength:20
Density:13
Smoothness:4
Note:(with the shape still selected,you can edit the actual effects(sponge and plastic wrap) with the help of Appearance panel found window>>Appearance ).
Show
Transparency panel from window menu and change the blend mode to
Soft Light.See Image below
Group the to ellipses.and position it on on the orange as shown below.
Choose
Object>>Arrange >>Send to Back and scale it down to hide the top and bottom edges,drag it slightly to the right to reveal a potion of it and
group everything .
The image below is rotated to -6.21 degrees.
Final image.